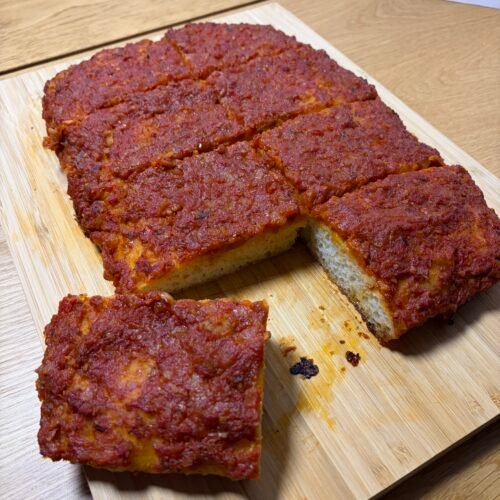
Philly-Style Tomato Pie
Thick, focaccia-style crust with a rich, cooked-down tomato sauce. In the Philly area it’s traditionally served at room temperature with no cheese.
Equipment
- 1 Stand Mixer w/ Dough Hook
- 1 9x13 or 10x15 High Rim Metal Pan Or Glass/Ceramic
Ingredients
Dough Ingredients
- 1½ tsp instant yeast
- 1 tsp honey
- 1½ cups AP flour 195g
- 1½ cups bread flour 195g
- ½ tbsp salt
- 1½ cups lukewarm water 350g
- ½ cup olive oil divided
Sauce Ingredients
- 1 tbsp extra-virgin olive oil
- 1 tbsp unsalted butter
- 1 tsp red pepper flakes
- 1 large shallot finely diced
- 4 cloves garlic minced
- 1 tbsp dried oregano
- 1 28-oz can whole peeled tomatoes, gently pulsed in blender
- 1 tbsp sugar
- ¾ tsp Morton coarse kosher salt
Instructions
Make the sauce first (it needs time to cool)
- Heat the olive oil, butter, and red pepper flakes in a large pot over medium heat.
- Add the shallot and cook until soft and translucent, [about 3 minutes].
- Add the garlic and oregano and stir until fragrant, about 30 seconds, so the garlic doesn’t burn.
- Add the tomatoes and their juices. Simmer, uncovered, for about 30 minutes, stirring occasionally so the bottom doesn’t scorch.
- The sauce is ready when it’s noticeably reduced and thick enough that a spoon dragged through it leaves a trail. A thick sauce keeps the crust from getting soggy.
- Stir in the sugar and salt, then taste and adjust. Set aside to cool while the dough finishes.
Make the dough
- Add the lukewarm water to the bowl of a stand mixer fitted with the dough hook. Whisk in the yeast and honey and let sit 5 minutes, until foamy. (If it doesn’t foam, your yeast may be dead or the water too hot or cold.)
- Add the flours and salt. Mix on low until the flour is incorporated, then increase to medium-high for 5 minutes. (If your mixer struggles or walks across the counter, drop to medium.)
- Turn off the mixer, cover the bowl with plastic wrap, and rest for 10 minutes.
- Resume mixing on medium-high for another 15 minutes. The dough will be very wet and sticky, closer to a thick batter than a traditional dough. That’s correct, and it’s what gives the crust its open, airy crumb. Don’t add more flour.
- Pour ¼ cup olive oil into a large bowl. Scrape the dough into the bowl with a rubber spatula and coat the top in oil. Cover and let rise until doubled in size, [about 1–1½ hours depending on your kitchen’s temperature].
- Add the remaining ¼ cup oil to the 9x13 or 10x15 pan. Pour the dough into the pan and gently pat it into the corners with oiled fingers. If it springs back, let it rest 10 minutes and try again. Cover and let rise another 30 minutes, until puffy.
- Dimple the dough heavily with your fingers, pressing all the way to the bottom of the pan.
Bake
- Bake at 450°F for 15 to 20 minutes, until the crust is set and just starting to turn golden.
- Remove from the oven and spread the sauce evenly over the top, spread all the way to the edges. It is ok for the sauce to touch the pan as it will caramelize as it bakes.
- Return to the oven and bake about 25-30 more minutes, until the sauce is bubbling and the edges are browned
- Let cool in the pan for 10 minutes, then lift out and cool further on a rack. Slice into squares and serve warm or at room temperature.
Notes
If you’re using a 10x15 pan:
- The dough has farther to travel, so patting it into the corners takes a little more patience. If it springs back, let it rest 10 minutes and try again.
- Thinner dough bakes faster, so start checking the crust at about 15 minutes for the first bake. It should be set and just starting to turn golden.
- After adding the sauce, check at about 20 minutes. You’re looking for bubbling sauce and deep golden edges.
- The sauce layer will be thinner.
If you’re using a 9x13 pan:
- Follow the bake times as written (20 minutes, then about 25 more).
- The dough will be thick and deeply dimpled, so press all the way down to the bottom of the pan.
- This version has the most sauce per square, so it’s the one for sauce lovers.
Why a Metal Pan Matters
Metal conducts heat quickly, so the bottom of the dough starts crisping the moment it hits the oven. The olive oil in the pan then fries the underside into a golden, crunchy base that pulls away from the pan cleanly. Glass and ceramic heat up slowly. The bottom of the dough stays pale and soft for longer, so it never forms that crisp, oil-fried crust. Instead it sets up damp and gluey against the pan, which makes the pie stick and tear when you try to lift it out. Once hot, glass and ceramic also hold their heat, so the edges can overbake while the bottom is still catching up. If glass or ceramic is all you have:- Use a little extra olive oil in the pan.
- Line the pan with a parchment sling, leaving overhang on the long sides, so you can lift the pie out.
- Run a thin knife or spatula around the edges as soon as it comes out.
- Let it cool 10 minutes before lifting, so the crust firms up.
- Expect a softer, paler bottom and check the bake times, since they may run longer.